The data model must be reprocessed regularly to ensure that it is updated with new data from the data source. This can be done manually, by opening the model definition file and processing the model, or on a scheduled basis.
Model processing schedules are used to auto-run the processing of data flows and data models. The data flows and models in the model definition file will then be processed automatically according to the schedule that was created. This scheduled processing can be set up from Model or from the Content Explorer.
- Click here to learn more about model processing.
- Click here to learn about scheduling model processing from the Content Explorer.
Important: This feature is not available in the Community Edition.
Set Model Scheduling
To create a model schedule, you need to open the Scheduler:
Opening the Scheduler in Model Pro
Click Schedule from the Data Flow, Data Model, or Security ribbon (this button is only enabled once the model file has been saved):

Note: The preceding image is of the Data Flow ribbon.
Opening the Scheduler from the CMS
If you are using the Content Manager, the Scheduler is available from the Metadata panel for your Model:
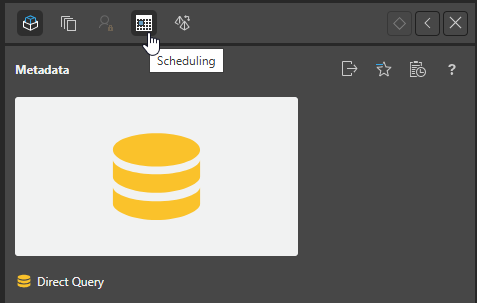
Scheduler
The Schedule panel will appear on the right of the interface. You can select:
- New Schedule: configure a new schedule for the current model.
- Go to schedule listing: go to the schedule listing for the current model in the content manager.

New Schedule
When creating a new schedule, you need to configure the Job Details and the Schedule.
Job Details
- Name: The default schedule name is the model name and the schedule creation date and time. You can change the name as required.
- Description: Add an optional description.
- ETL Execution Part: Execute the entire Master Flow (including data flow and models) or execute the models only.
- Override Security: Select this checkbox to override metadata security set from the Admin console or the Materialized Manager. Clear this checkbox if metadata security should not be affected by processing the data model. Click here to learn more.
- Sync Model Columns: Select how the tables in the model should be synchronized. Click here to learn more.

- Click here to learn more about syncing column settings
Schedule
Under Schedule, set the schedule to Once or Recurring.
Once
Select Once from the dropdown list to run the schedule once only, either immediately or at a specified time and date:
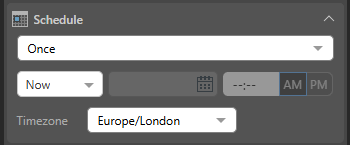
- Now: The schedule will run immediately.
- Delayed: The schedule will run at the specified time and date.
Timezone
Select the required timezone from the Timezone dropdown list. The schedule will run according to the selected timezone.
Recurring
Recurring schedules run on a regular frequency. Once you select the frequency of the schedule, you can set it to run at specified intervals; for example, every Monday, every quarter, or every two weeks:
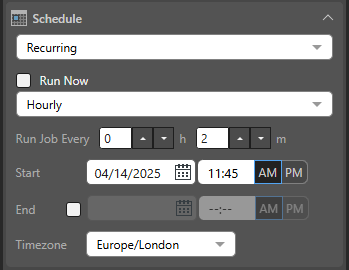
- Run Now: Select this checkbox to run the schedule immediately.
- Hourly: Run the job every x hours and y minutes, starting from the specified Start time and date.
- Daily: Run the job either on the selected Specific Days or every x days (Days Interval).
- Weekly: Run the job every x weeks on the selected Days.
- Monthly: Run the job every x quarter, month, or all, based on the following pattern:
- Week and Days: Run the schedule during the specified week of the given months, on a given day.
- Calendar Days: Run the schedule on a given calendar day or on the last day of the month.
- Workdays: Run the schedule on a specific working day (Days) during the month, or on the last working day of the Month.
Tip: Your First Workday is configured by the Administrator as part of the tenant default configuration. Your workdays are typically Monday through Friday.
Start and End
For each recurring schedule option:
- Start: The date and time when the job starts running. All schedules need a Start date and time.
- End: Optional. The date and time when the job will stop running. If no end date and time are given, the schedule will continue running indefinitely.
Timezone
- Timezone: The timezone that your schedule should occur in. This is particularly important when building publications for a global audience.
Save and Run the Schedule
To save and run the new schedule, click the Save & Run button (red highlight below):

If the schedule is saved successfully, you'll see a confirmation message:

On Demand Schedules
On Demand Schedules can be enabled from the Master Flow. They are used to trigger the rendering of specified publications, alerts, and subscriptions only when their underlying data model(s) is reprocessed. If the specified data models have been reprocessed when the Data Flow is executed, the schedule will be triggered for any corresponding publications, alerts, and subscriptions set to run on demand.
- Click here to learn how to enable On Demand Schedules from the Master Flow.
Edit a Scheduled Job
To edit a scheduled job, open the Schedules panel from the model's Actions Panel in the Content Explorer, and under actions select Stop, Start, Edit, or Delete.

You can also click on a schedule that was run to view its Job Executions.
- Click here to learn more about managing the schedule.

Schedule Handling
Schedule Handling allows users to determine how a task will behave if there are issues when it runs.

- Schedule Timeout: The maximum length of time a task will run before it is aborted. None means that the job will run without aborting.
- Disable Schedule after Consecutive Failure: The maximum number of times the task will attempt to run before it is abandoned. Once a task has failed more times than this value, the task will be canceled and will only run if it is manually restarted. Never disable means that the job will run without aborting.
Note: If the task is aborted after the configured number of consecutive failures, an email message will be sent to the admins and model owner.
Note: Selecting System Default for these options applies the default setting created by your administrator in the System Schedule.
Automatic Column Handling
Automatic Column Handling allows users to update chosen tables in the semantic model each time the model is processed by automatically adding new columns to the semantic model added physically to the underlying tables.
- Click here to learn more about automatic column handling